Hi. In this article I’ll show how to change the front sprocket on a motorcycle. I will be using my Honda CB500X as an example.
Contents
Tools you will need for this job are:
- Torque wrench.
- 8 mm and 14 mm sockets.
- 10 and 12mm wrenches.
- New Sprocket compatible with your bike model.
- Kerosene, Brake Cleaner or any other degreaser.
- Cleaning brush.
- Spline grease (optional).
- Gloves (optional).
Based on your bike model, you may need slightly different socket and wrench sizes but most bikes are using similar bolt sizes for these parts.
#1 Get Access to the Sprocket
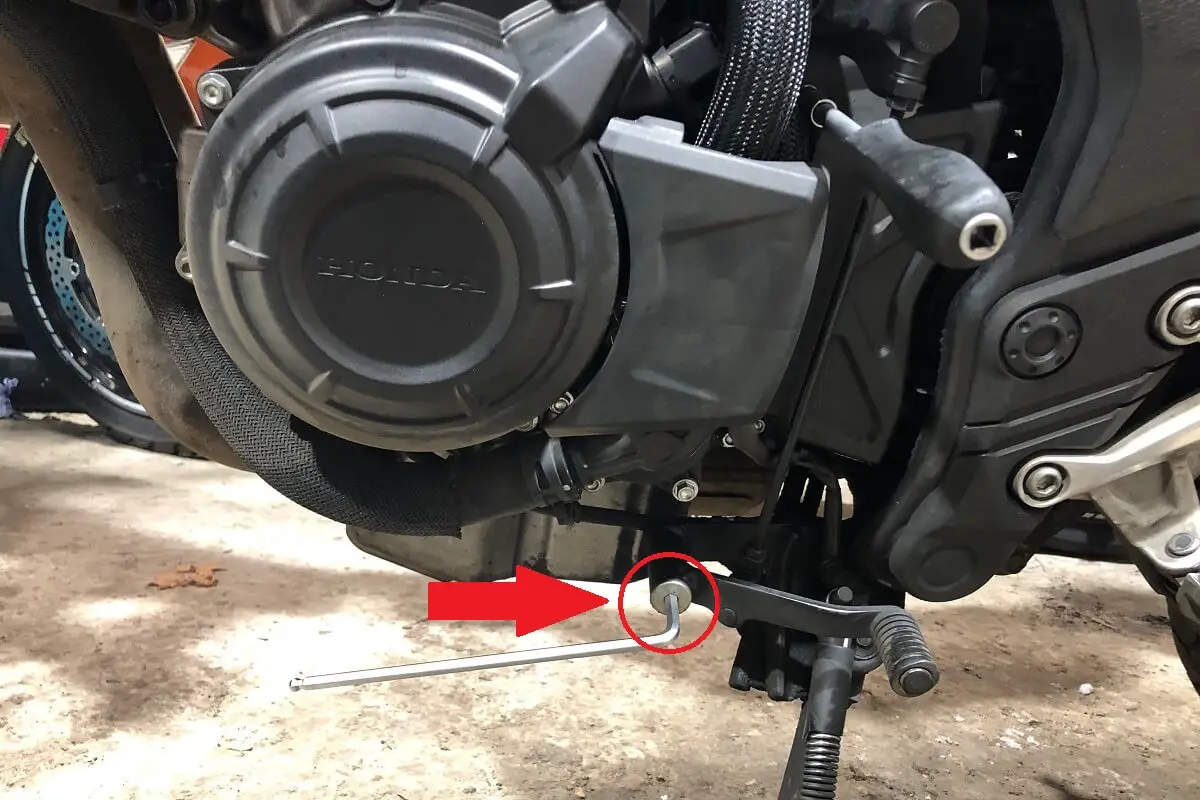
First of all we need to get access to the front sprocket. Start by removing the gear shift lever and plastic cover. I prefer unscrewing the gear shift lever from the bottom and moving it out of the way.


When gear shift lever is out of the way. We can unbolt the plastic cover by removing 2 bolts. One bolt is at the top and the other is at the bottom of plastic cover. Once these bolts are removed – wiggle plastic cover out and unplug the retainer clip that secures the side stand sensor.


Note that there is typically a significant amount of dirt on the inside of the cover and near the front sprocket. For skin protection, it’s advisable to wear gloves while working in these areas.
#2 Remove the Old Sprocket
To remove the front sprocket, first, place your bike in first gear. This action should provide enough resistance for most models, like the Honda CB500X, where the drive sprocket bolt is torqued to 54 Nm. Use a wrench counter clockwise to loosen the 14mm bolt.
If you encounter resistance, such as the engine spinning or the bike moving without the bolt loosening, try lying over the bike seat, chest down. Use your right hand to apply the rear brake and your left hand to pull the wrench. This extra leverage and braking force can help. Alternatively, you can ask someone to assist by pressing the rear brake while you focus on loosening the bolt.


After you’ve successfully loosened the bolt, remove it completely. Then, gently wiggle the front sprocket to free it from the drive shaft splines. Once it’s loose, you can easily take it out.
Here is old and new sprocket comparison after 15 thousand kilometers.

As you can see from the image above, the old sprocket teeth are significantly thinner and are bent.
The decision to replace the front sprocket is well-timed. It’s important to note that my chain and rear sprocket are still in good condition, and don’t require replacement. Replacing front sprocket now is a proactive step to ensure the chain can reach its full lifespan, potentially another 15,000 kilometers, without being compromised by a worn front sprocket.
#3 Clean the front sprocket Area
Now it is time to clean everything. You can see how much dirt has accumulated in the area after just 15k km.
I will be using kerosene and soapy water for cleaning and degreasing surfaces. Kerosene is particularly effective at breaking down grease and oil, while soapy water can help in removing residual dirt. Simple plastic brush is the best way to apply kerosene and agitate the dirt. Bellow is the before and after picture. Cleaning took me 10 minutes.


#4 Install New Sprocket
After thoroughly cleaning the front sprocket area and ensuring it’s clean and shiny, the next step is to install the new sprocket. Applying spline grease to the front sprocket mounting splines is a wise practice. The use of spline grease, especially the type containing molybdenum, is beneficial as it binds to the metal surface, reducing wear on the splines.


When installing a new front sprocket, it’s important to consider the differences in sprocket teeth thickness compared to the old, worn-out sprocket. The new sprocket’s thicker teeth can result in slightly increased chain tension. If you find it challenging to fit the new sprocket onto the splines due to this tension, adjusting the chain tension at the rear wheel is a practical solution.
Loosening the chain tension will provide more slack in the chain, making it easier to maneuver and align the new sprocket onto the splines. This adjustment ensures a smoother installation process without forcing the components into place. Once the new sprocket is properly installed, you can then readjust the chain tension to the appropriate level.
Finally, tighten the front sprocket bolt to the specified torque. For my bike, Honda CB500X it is 54 Nm.
Note that it’s normal for the front sprocket on Honda motorcycles, and many other bikes, to have a slight side-to-side movement. This is by design and shouldn’t be a cause for concern. The lateral play in the sprocket allows for some flexibility in the drive train, accommodating minor misalignments and reducing stress on the bearings and shaft. As long as the movement is within the manufacturer’s specifications and the sprocket is properly torqued, your motorcycle will operate smoothly.

Generally, it’s advisable to set your motorcycle’s chain tension a bit on the looser side rather than too tight. Over-tightening the chain can lead to excessive wear on various components like the chain itself, sprockets, final drive splines, and rear wheel bearings. It also puts undue stress on swingarm bearings and can negatively impact the performance of the rear suspension.
#5 Finalize Installation
Now, proceed with reinstalling the plastic cover and the gear shift lever. It’s a good practice to apply copper spray to the bolt threads. This serves as an anti-seize compound, making it easier to unbolt them in the future when you need to perform this job again. Additionally, applying fresh grease to the gear shift lever mounting bolt is beneficial. This lubrication helps ensure smoother operation of the gear shift lever, contributing to a better shifting experience and reducing wear on the moving parts. I simply use the same grease as I used for the splines.
The front sprocket is now replaced. Happy riding!
FAQ
What are the primary reasons for changing the front sprocket on a motorcycle?
The front sprocket tends to wear out faster than the rear sprocket and the modern chains. This is often because the front sprocket typically has around three times fewer teeth than the rear sprocket, leading to a greater physical load on each tooth.
Considering that modern chains can last up to 40,000 kilometers, it’s economical to replace just the front sprocket at 15-20,000 thousand kilometers, as it’s much less expensive than replacing the entire chain and sprocket set.
Furthermore, if the sprockets are in good condition, this can significantly slow down the chain’s wear, thereby extending its lifespan and further reducing motorcycle maintenance costs.
What is the recommended interval for replacing the front sprocket on a motorcycle
The lifespan of a front sprocket can reach up to 20,000 kilometers, provided the chain tension is correctly adjusted. Over-tightening the chain will drastically reduce this lifespan. Some enthusiasts suggest a strategy for maximizing the sprocket’s usage: flipping the front sprocket after 10,000 kilometers and then replacing it after an additional 10,000 kilometers. This practice can help in evenly distributing wear and potentially reducing the chain wear.
What benefits can be gained from replacing the front sprocket on a motorcycle?
Replacing the front sprocket on a motorcycle offers several benefits:
- Improved Performance: A new sprocket can restore or enhance the bike’s performance. Worn teeth on an old sprocket may cause the chain to vibrate more, negatively affecting overall ride quality.
- Extended Chain Life: A worn sprocket can accelerate the wear of the chain. Replacing it will help extend the life of the chain, as a new sprocket ensures better and more even engagement with the chain links.
- Cost-Effectiveness: Since the front sprocket usually wears out faster than the rear sprocket and the chain, replacing only the front sprocket when needed can be more cost-effective than replacing the entire set.
- Smooth Ride: A new sprocket can lead to a smoother, more comfortable ride. It eliminates issues like jerking or lurching that are common with a worn sprocket.
- Preventive Maintenance: Regularly replacing the front sprocket before it becomes excessively worn can prevent damage to other components of the motorcycle’s drive system like rear wheel bearings and final drive splines.
Which size front sprocket should be used?
Inspect your bike’s manual. If you want to change gear ration – go one tooth up or down. For instance, I use a 1 tooth bigger front sprocket on my Honda CB500X as it allows to cruise at lower revs in 6th gear resulting in less vibrations.


